
A tiled floor that lasts for decades and one that cracks, sounds hollow or looks uneven within a year can use exactly the same tiles. The difference is almost always the installation.
Whether you are doing a small job yourself or checking your contractor’s work, this guide explains how tiles should be installed, step by step, and the mistakes that cause most problems.
The layers under a tile
A tiled floor or wall is built up in layers, and each one has to be right:
- Substrate: the base surface, such as a concrete slab, cement screed or plastered wall. It must be solid, clean, flat and dry.
- Primer: used on porous or dusty surfaces so the adhesive bonds properly.
- Waterproofing: in bathrooms, wet kitchens and balconies, a waterproof membrane goes on before any tiles.
- Tile adhesive: the bed that holds each tile in place.
- Tiles.
- Grout: fills the joints between tiles.
What you need
- Tiles, plus about 10% extra for cuts and breakages. Our tile calculator works out the quantity.
- Tile adhesive suited to the tile and the area, and grout.
- A notched trowel, a spirit level, a tape measure and a chalk line.
- Tile spacers and, for large tiles, a tile levelling system.
- A tile cutter or wet saw, a rubber grout float, sponges and buckets.
Step-by-step installation
1. Prepare the surface
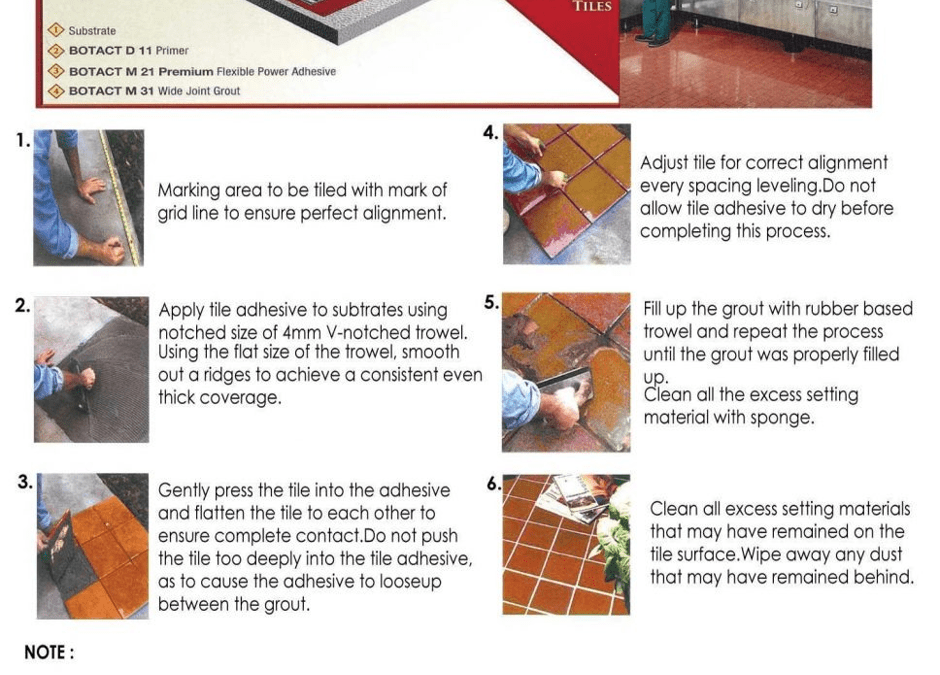
Remove dust, paint, oil and loose material. Check the surface with a long straight edge and fill hollows or grind high spots. A flat substrate is the foundation of a flat floor, especially with large tiles. In wet areas, apply the waterproofing and let it cure.
2. Plan the layout
Lay out a row of tiles dry, with spacers, before mixing any adhesive. Find the centre of the room or the key line (for example, the doorway or the wall you see first) and plan so that cut tiles fall at the edges and are not too thin. Mark reference lines with a chalk line.
3. Mix and spread the adhesive
Mix the adhesive as the pack instructs. Spread it first with the flat side of the trowel, pressing it into the surface, then comb it with the notched side to create even ridges. Only spread as much as you can tile before the adhesive starts to skin over, and follow the notch size recommended for your tile size.
4. Back-butter large tiles
For tiles of 600 mm and larger, and for all floor tiles in heavy-use areas such as car porches, also spread a thin layer of adhesive on the back of each tile. This fills the gaps between the ridges so the tile is fully supported with no hollow spots, which is what prevents cracking.
5. Lay the tiles
Place each tile onto the adhesive and press it down with a slight twisting or sliding movement to collapse the ridges. Put spacers in the joints to keep them even. Lift a tile occasionally to check that the back is fully covered. Do not tap tiles tight against each other: they need a joint to allow for movement.
6. Check level and alignment as you go
Use a spirit level across neighbouring tiles and adjust while the adhesive is still workable. With large tiles, levelling clips keep the edges flush. On floors that drain, such as bathrooms and balconies, follow the planned slope to the floor trap rather than laying perfectly level.
7. Leave movement joints
Leave a small gap at the walls and at other fixed edges, covered later by skirting or filled with a flexible sealant. Large floors, and outdoor areas especially, also need flexible movement joints at intervals so the tiles can expand and contract without lifting.
8. Let the adhesive set
Keep off the tiles until the adhesive has set, as the pack specifies, usually about 24 hours. Remove the spacers before grouting.
9. Grout the joints
Mix the grout and press it diagonally across the joints with a rubber float until they are fully packed. Remove the excess with the edge of the float, then wipe the tiles with a damp, well-wrung sponge once the grout has firmed slightly. Our grout guide explains cement and epoxy grout and how to pick a colour.
10. Clean and cure
When the grout has dried, buff off the haze with a dry cloth. Keep foot traffic and water off the area for at least 24 hours, or as the grout instructions say. Covering the floor with board or cardboard protects it while other work goes on.
Common mistakes that cause problems
- Dabs of cement instead of full coverage. Tiles laid on a few blobs of mortar leave hollow spots that sound hollow when tapped and crack under load.
- Skipping surface preparation. Adhesive does not bond to dust or paint, and an uneven base means uneven tiles.
- No movement joints. Tiles fixed tight from wall to wall can lift or “tent” when they expand in the heat.
- Grouting too soon. Grouting before the adhesive has set can shift the tiles.
- No waterproofing in wet areas. Grout is not waterproof. Without a membrane, water eventually finds its way into the slab below.
Worth knowing before you buy
- Buy from the same batch. Colour can vary slightly between production batches, so buy all the tiles for one area at once, including the spares.
- Natural variation is normal. Stone-look and fired tiles are designed to vary slightly from piece to piece. Mix tiles from several boxes as you lay them.
- See it in person. Choose tiles from real samples rather than photos, because colour looks different under different light.
- Keep spare tiles. A few spares make a future repair invisible.
Not sure which tile suits the area? Our guide to ceramic, porcelain and homogeneous tiles explains which type works in which room.
Planning a tiling job? Work out how many tiles you need, then come and see the tiles, adhesive and grout in person at our Sungai Buloh showroom.
Frequently asked questions
Can I tile over existing tiles?
Sometimes. The old tiles must be firmly bonded, flat and clean, and you need an adhesive made for tiling over tiles. It also raises the floor level, which affects doors and drains. If the old tiles sound hollow, remove them first.
How long before I can walk on new tiles?
Usually after about 24 hours, once both the adhesive and the grout have set. Check the times on the products used.
Why do tiles sound hollow when tapped?
There are voids in the adhesive underneath, usually from tiles laid on dabs of mortar or without back-buttering. Hollow tiles are more likely to crack or come loose.
How much extra tile should I buy?
About 10% for a simple room, and 15% for rooms with many corners, a diagonal layout or large tiles.
Should I install tiles myself or hire a tiler?
Small wall areas are manageable for a careful DIYer. Floors, large-format tiles and wet areas that need waterproofing are best left to an experienced tiler.